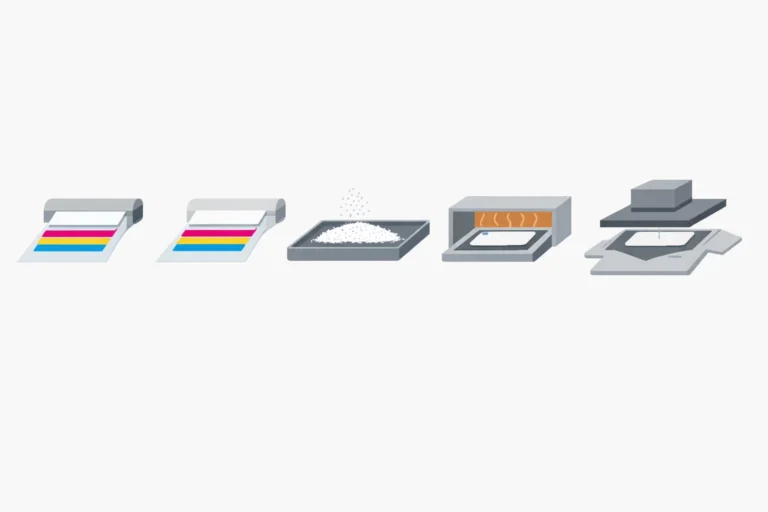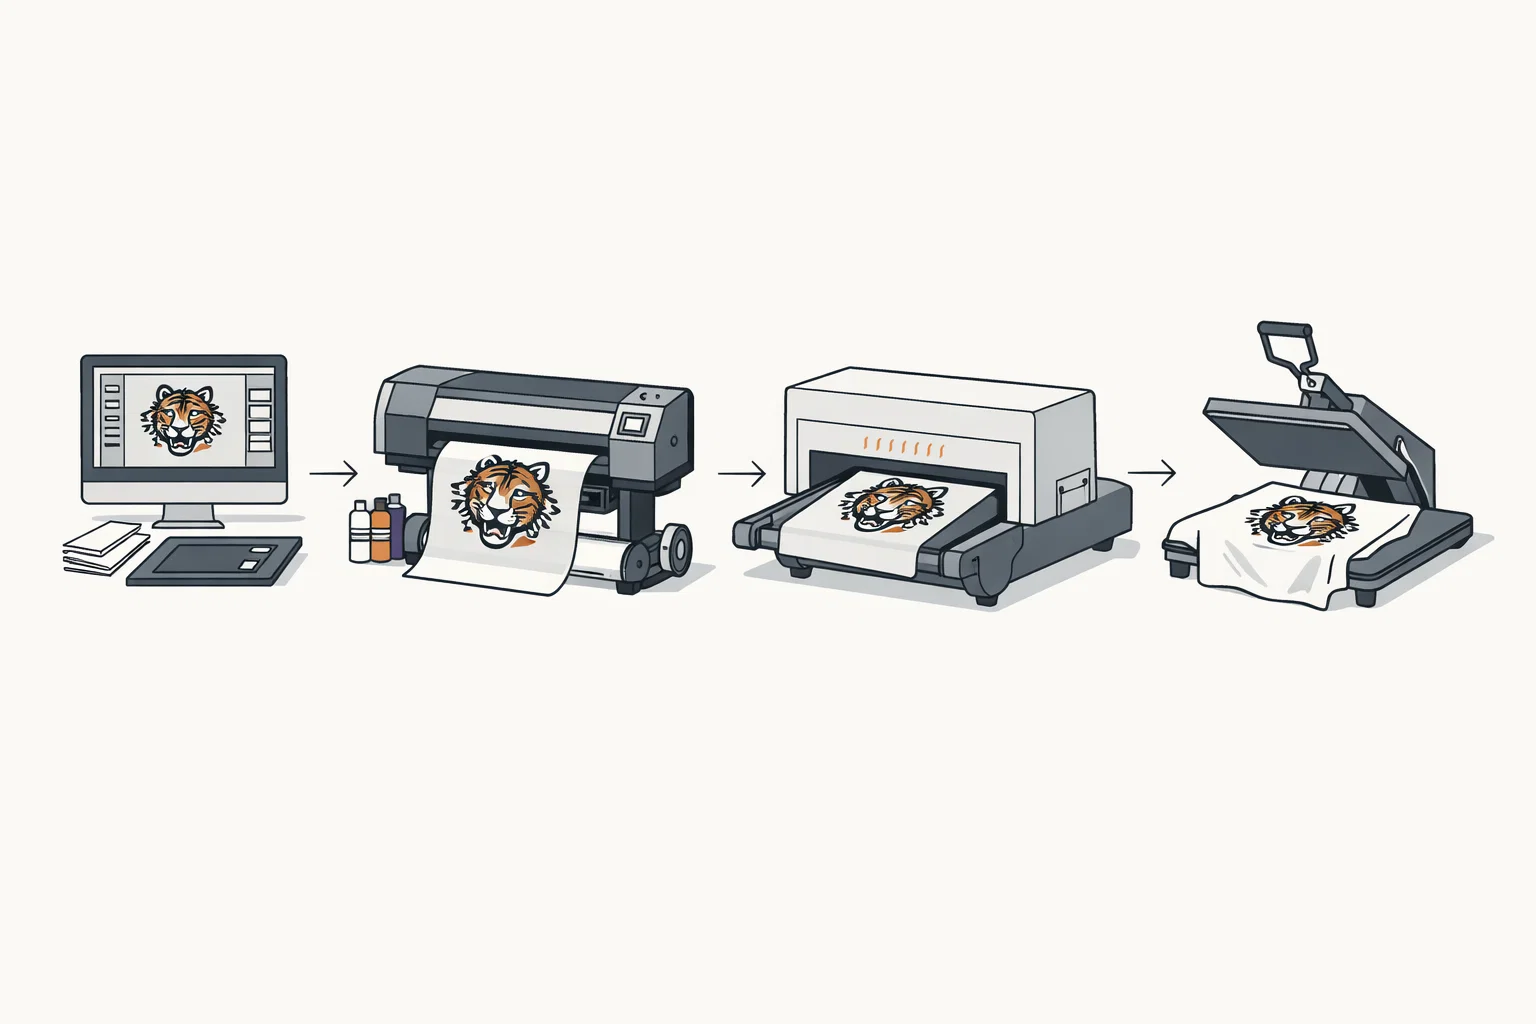
Step-by-step overview of the DTF printing workflow from design preparation to finished heat press transfer.
The DTF printing workflow has become one of the most discussed topics in modern apparel production. As more print shops adopt Direct to Film technology, understanding the complete workflow from design preparation to finished transfer is no longer optional. It is a core requirement for consistent quality, efficient production, and scalable operations.
Unlike traditional printing methods, DTF follows a structured, repeatable process that separates design, printing, curing, and garment application into clearly defined stages. This workflow flexibility is one of the main reasons DTF printing continues to expand across print shops of all sizes.
This guide explains the full DTF printing workflow step by step, showing how each stage contributes to durability, color accuracy, and production efficiency.
What Is a DTF Printing Workflow?
A DTF printing workflow refers to the complete production sequence used to create and apply Direct to Film transfers. Instead of printing directly onto garments, designs are first printed onto PET film, prepared with adhesive powder, cured, and later transferred using a heat press.
This separation allows print shops to manage production in batches, reduce downtime, and respond quickly to on-demand orders. Each step in the workflow plays a specific role, and skipping or rushing any stage often results in poor adhesion, cracking, or wash failures.
Design Preparation in the DTF Workflow
Every DTF job begins with digital design preparation. Artwork is typically created in software such as Photoshop, Illustrator, or Affinity, using high-resolution files suited for print.
At this stage, designers prepare color layers and ensure white ink placement is properly defined. White ink is critical in the DTF workflow because it acts as a base layer that maintains color vibrancy on both light and dark fabrics. Poor design setup at this stage often leads to dull prints or transparency issues later in production.
Printing on PET Film
Once the design is finalized, it is printed onto PET film using a DTF printer. The printer applies CMYK inks followed by a white ink layer to ensure opacity and color accuracy.
The film serves as the carrier for the design and allows the printing stage to remain separate from garment application. This step is one of the key advantages of DTF printing, as it enables print shops to prepare transfers in advance without committing to specific garments.
Adhesive Powder Application
After printing, adhesive powder is applied to the wet ink on the PET film. This powder forms the bond between the printed design and the fabric during heat pressing.
Even and consistent powder coverage is essential. Too little powder can cause weak adhesion, while excess powder may result in rough texture or visible residue. Many workflow issues blamed on printers or ink quality actually originate at this stage.
Curing the Printed Film
Curing is one of the most critical steps in the DTF printing workflow. During curing, heat is applied to melt and activate the adhesive powder so it can properly bond during transfer.
Curing can be done using a dedicated curing oven or controlled heat press hover methods, depending on production volume. Inconsistent curing temperatures or insufficient curing time often lead to peeling or cracking after washing. For this reason, many professional operations rely on controlled curing equipment to maintain consistency.
Heat Press Transfer to Garment
Once cured, the film is ready for garment application. The transfer is positioned on the fabric and applied using a heat press with controlled temperature, pressure, and dwell time.
Most DTF transfers are pressed between 300 and 320°F for 10 to 15 seconds using medium to firm pressure. Depending on the film type, the transfer may be peeled hot or cold. Accurate placement and even pressure are essential to avoid edge lifting or incomplete adhesion.
Final Press and Quality Control
After peeling the film, a final press is performed to seal the design into the fabric. This step improves durability, smoothness, and wash resistance.
Quality control checks are typically done at this stage to confirm adhesion strength, color consistency, and surface finish. Print shops that follow a consistent final press routine report significantly fewer customer complaints and reprints.
Why the DTF Workflow Matters for Print Shops
Understanding and controlling the DTF printing workflow is essential for modern print shops, especially those handling on-demand apparel production. A well-structured workflow allows shops to scale output, reduce waste, and maintain predictable quality across orders.
Because each stage is modular, print shops can optimize individual steps without disrupting the entire process. This flexibility makes DTF printing particularly attractive in environments where turnaround speed and customization are critical.
As adoption continues to grow, print shops that master the DTF workflow position themselves to handle higher volumes, diverse fabrics, and evolving customer expectations.
Final Thoughts
The DTF printing workflow is more than a technical process. It is the foundation that allows Direct to Film technology to deliver consistent, durable, and high-quality results across a wide range of apparel applications.
From design preparation and printing on PET film to curing, heat press transfer, and final finishing, each step contributes to the performance of the final product. Print shops that treat the workflow as a system rather than isolated steps gain a clear competitive advantage.
As DTF printing continues to shape the future of apparel decoration, mastering the workflow remains one of the most valuable investments a print operation can make.
About the Author